Are you just starting your tennis game? Wondering which tennis grip will work best for you?
How you hold the tennis racquet will significantly impact your tennis game. At least, every tennis player will learn three tennis grips for their forehand, backhand, and serve. So I’ve listed and explained all types of tennis grips with photos to help you easily understand and make you a better tennis player.
My name is Lin, and I am a tennis enthusiast. I’ve spent 3 weeks researching all types of tennis grips and reaching out to tennis coaches and pro players about how each position of holding the racquet impact the strokes.
Finally, here is a list of all the tennis grips you can find that can boost your tennis game.
Table of contents
- Tennis Grip Basis
- Eastern Forehand
- Semi-western Forehand
- Western Forehand
- Eastern Backhand
- Semi-western Backhand
- Two-handed Backhand
- Serve Grip
- Volley, Slice, Overhead, Dropshot
- Recommended Grips for Beginners & Intermediate Players
- How to Hold the Racquet Properly
- How to Choose the Racquet Grip Size
Keep reading to find out which works best for you. ????
1. Tennis Grips Basis
The tennis racquet handle divides into 8 sides, as shown in the diagram. All sides are referred to as bevels from 1 to 8 clockwise for right-handers and counterclockwise for left-handers.
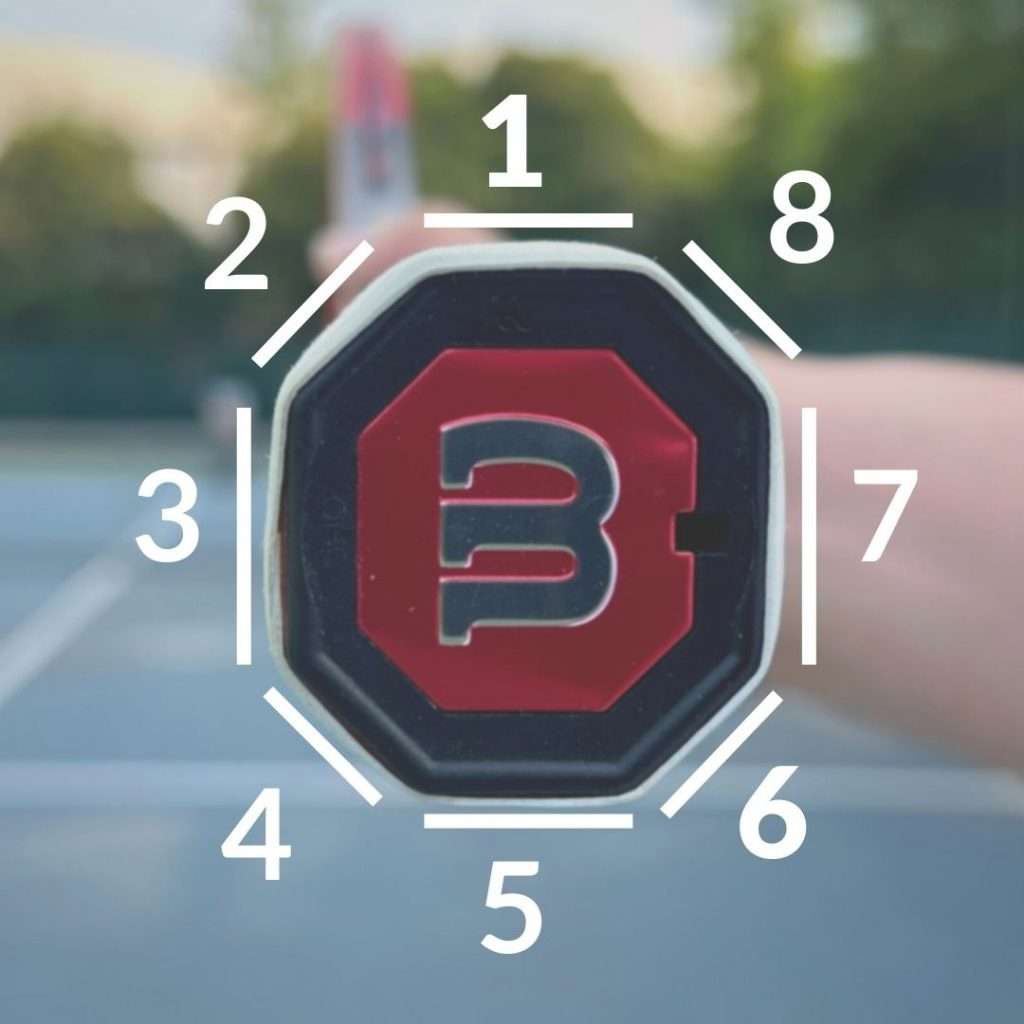
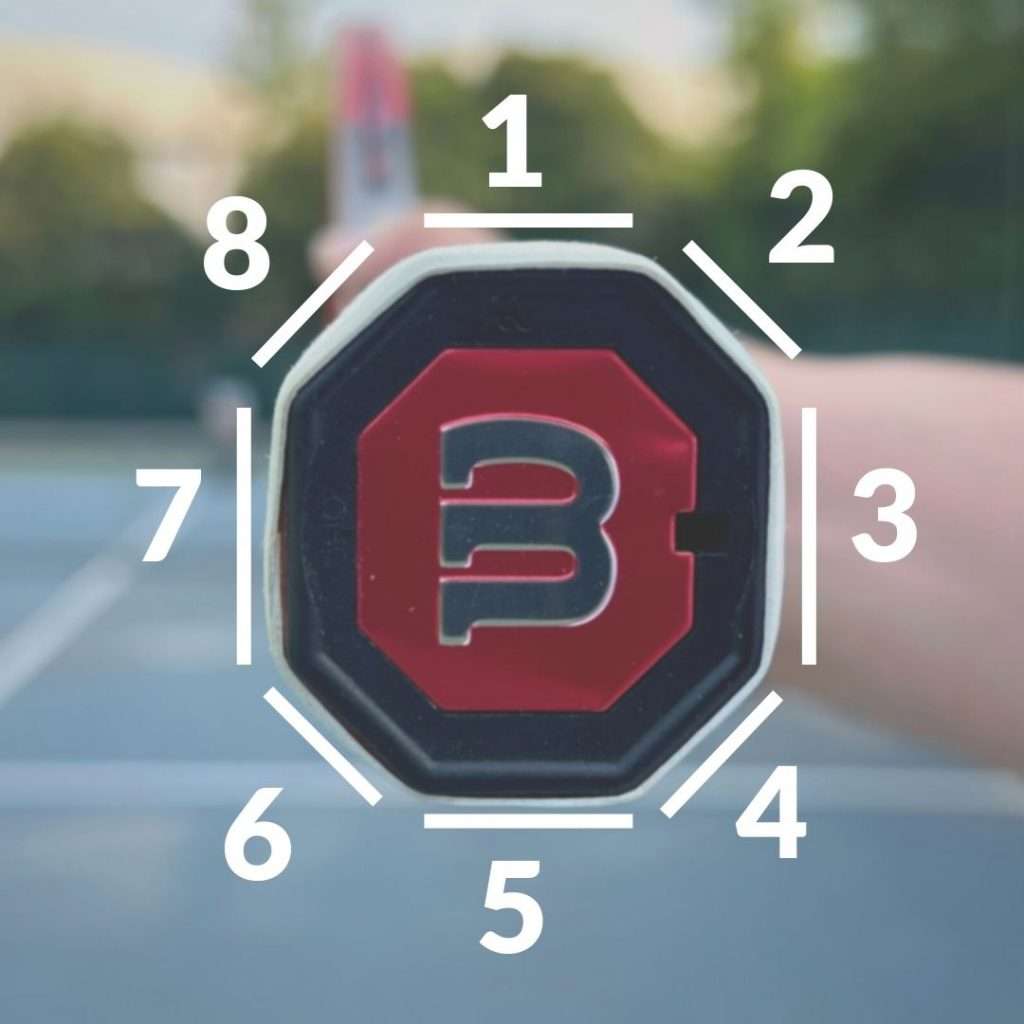
To determine what grip you use depending on which bevels the knuckle of your index finger is placed on.

2. Eastern Forehand
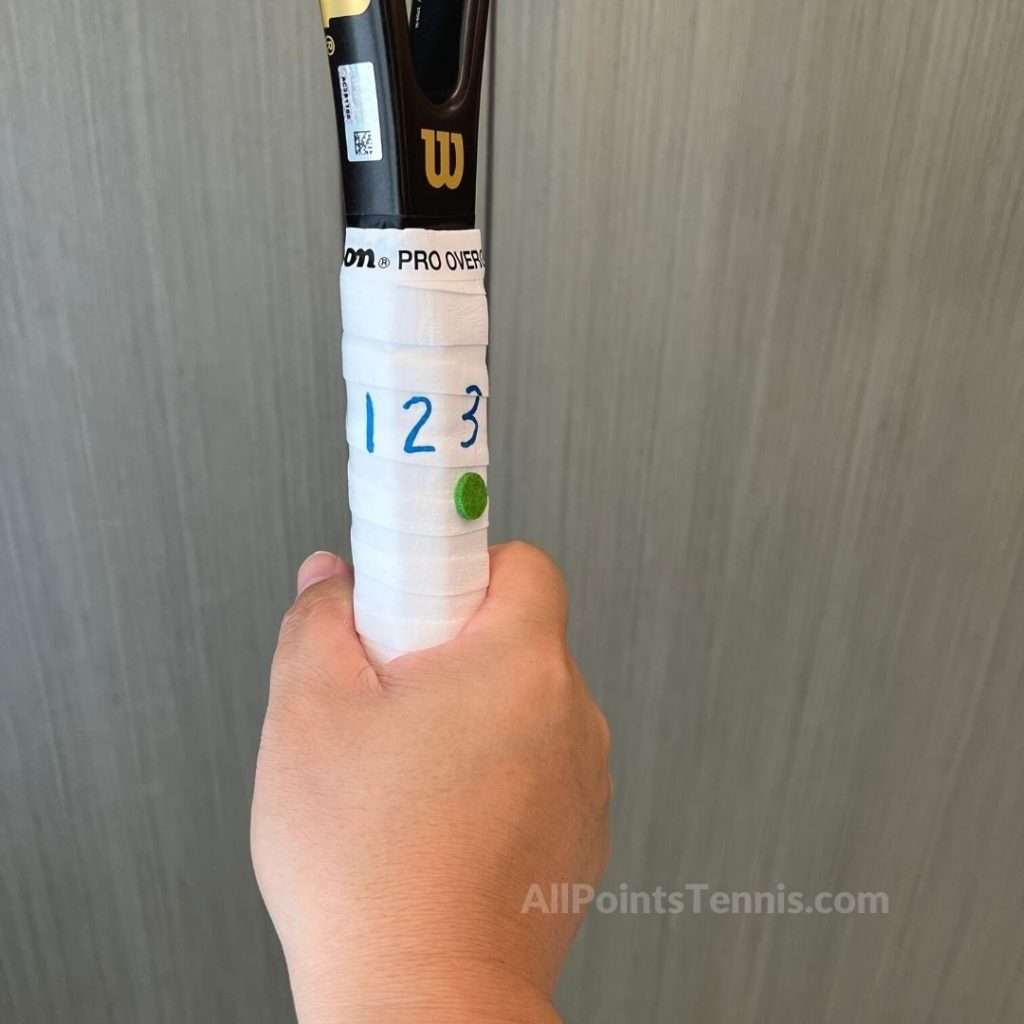
Place your index finger knuckle on Bevel 3. It’s used for beginners learning to hit a forehand. Used for fast, flat shots. It can change quickly to the continental grip for volleys.
- Position: bevel 3
- Ideal for: forehand
- Pros: moderate topspin, quick grip changes, best for attacking the net, works well on hard court
- Cons: less control for high balls, might cause wrist injuries, not ideal for long rallies
3. Semi-western Forehand
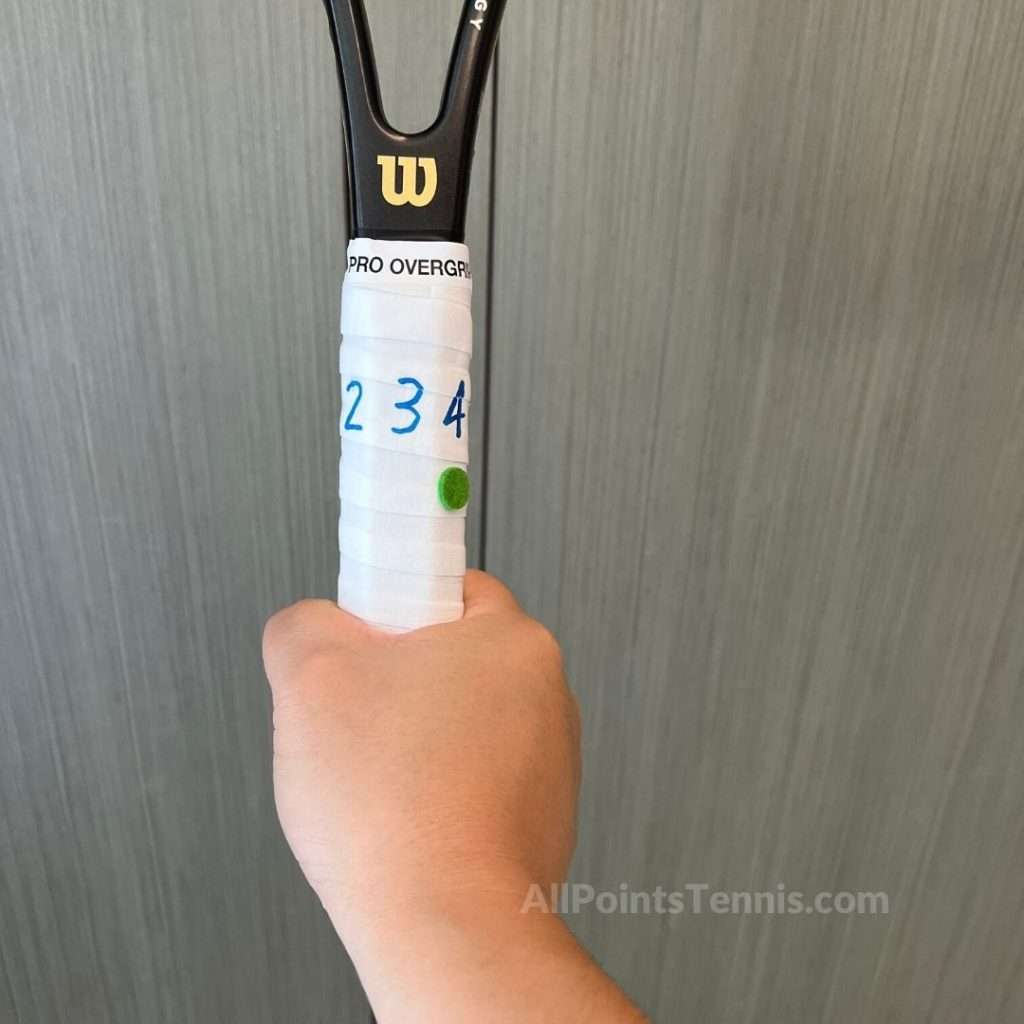
Place your index finger knuckle on Bevel 4. Pro players like Novak Djokovic, Andy Murray, and Stan Wawrinka use this forehand grip. This grip generates more spin and less stress to the wrist than the eastern grip. Also, it allows for shots farther in front of you and a great defense against higher bouncing balls.
- Position: bevel 4
- Ideal for: forehand
- Pros: topspin and power, higher and faster balls, less stress to the arm than Eastern grip, works on all court surfaces
- Cons: hard to return low balls, challenging to change to the Continental grip for volleys, less speed than eastern grip
4. Western Forehand
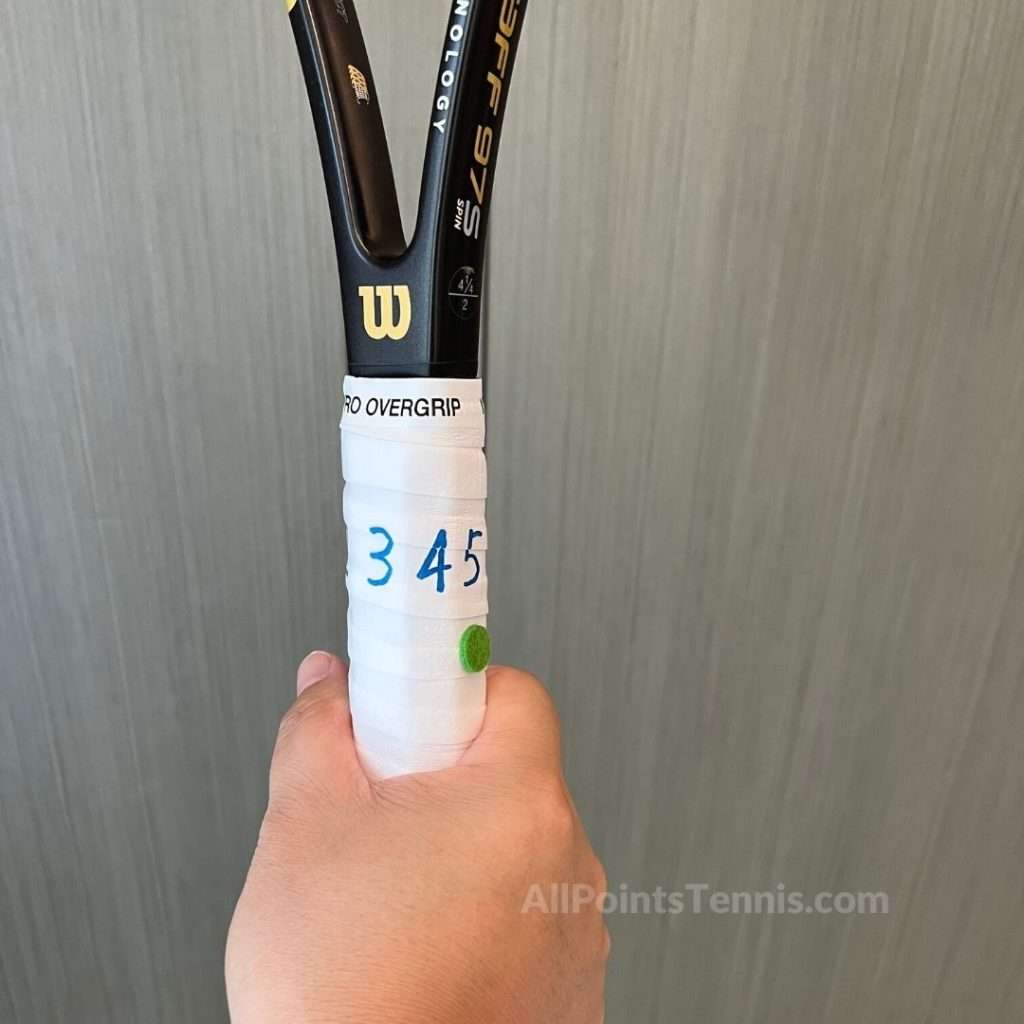
Place your index finger knuckle on Bevel 5. This grip generates the topspin of all other grips, suitable for slow and bouncy courts. It cannot hit the ball with speed comparing other forehand grips. It’s difficult to change grips and hit low balls close. Ideal for players who have a solid baseline game. Rafael Nadal and Alexander Zverev use the western grip.
- Position: bevel 5
- Ideal for: forehand
- Pros: extreme topspin, suitable for slow and bouncy courts
- Cons: hard to return low balls, challenging to change grip from Continental, harder to use on faster court surfaces
If you want to know more about which forehand grips you should take, check our article on Forehand Grips learning how to find the best right grip for your forehand.
5. Eastern Backhand
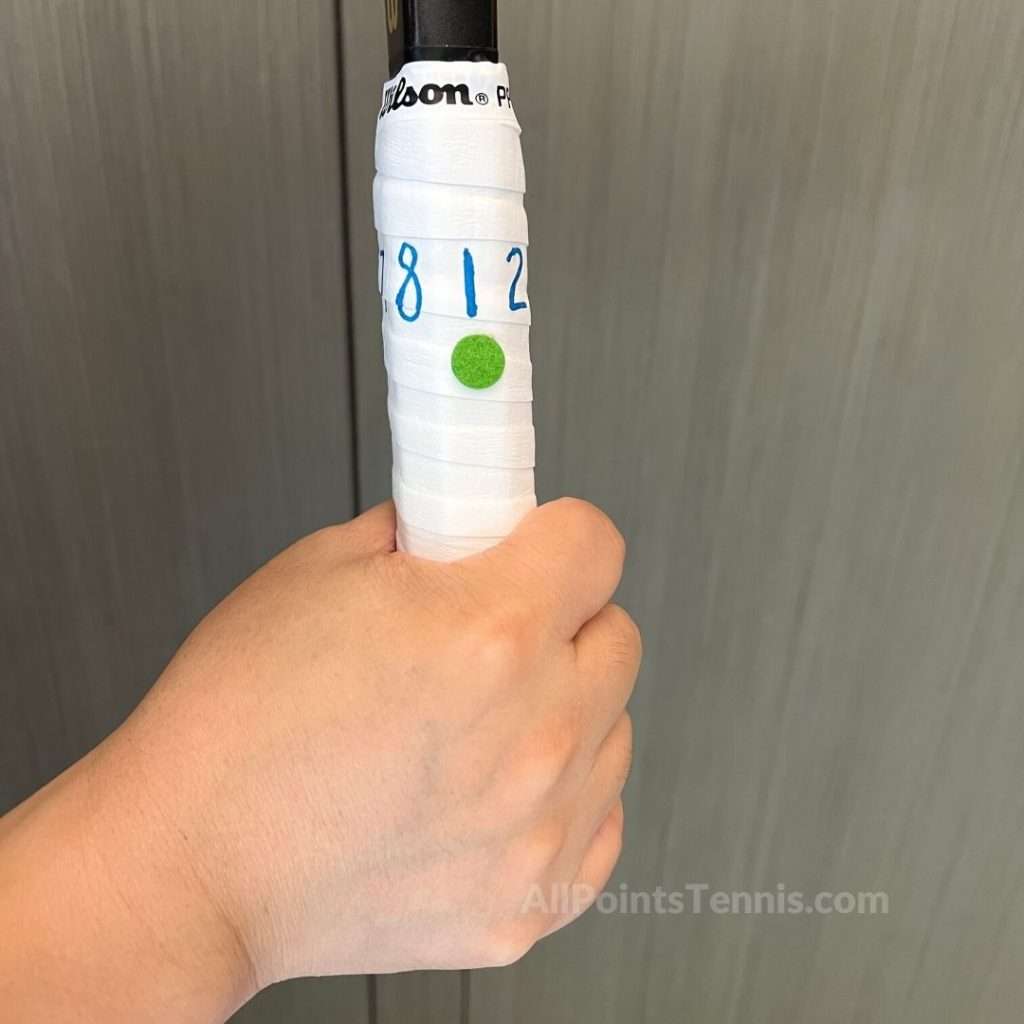
Index finger knuckle on Bevel 1. The racquet handle runs roughly parallel to the rest of the knuckles. This grip generates more power but less topspin than a semi-western backhand. The wrist position is neutral. Roger Federer and Stefanos Tsitsipas both use the Eastern Backhand grip.
- Position: all finger knuckles on bevel 1,
- Ideal for: one-hand backhand
- Pros: works well both on control and topspin, easy transition into volleys, also used for a kick serve
- Cons: less topspin than semi-western backhand, harder to handle high balls
6. Semi-western Backhand
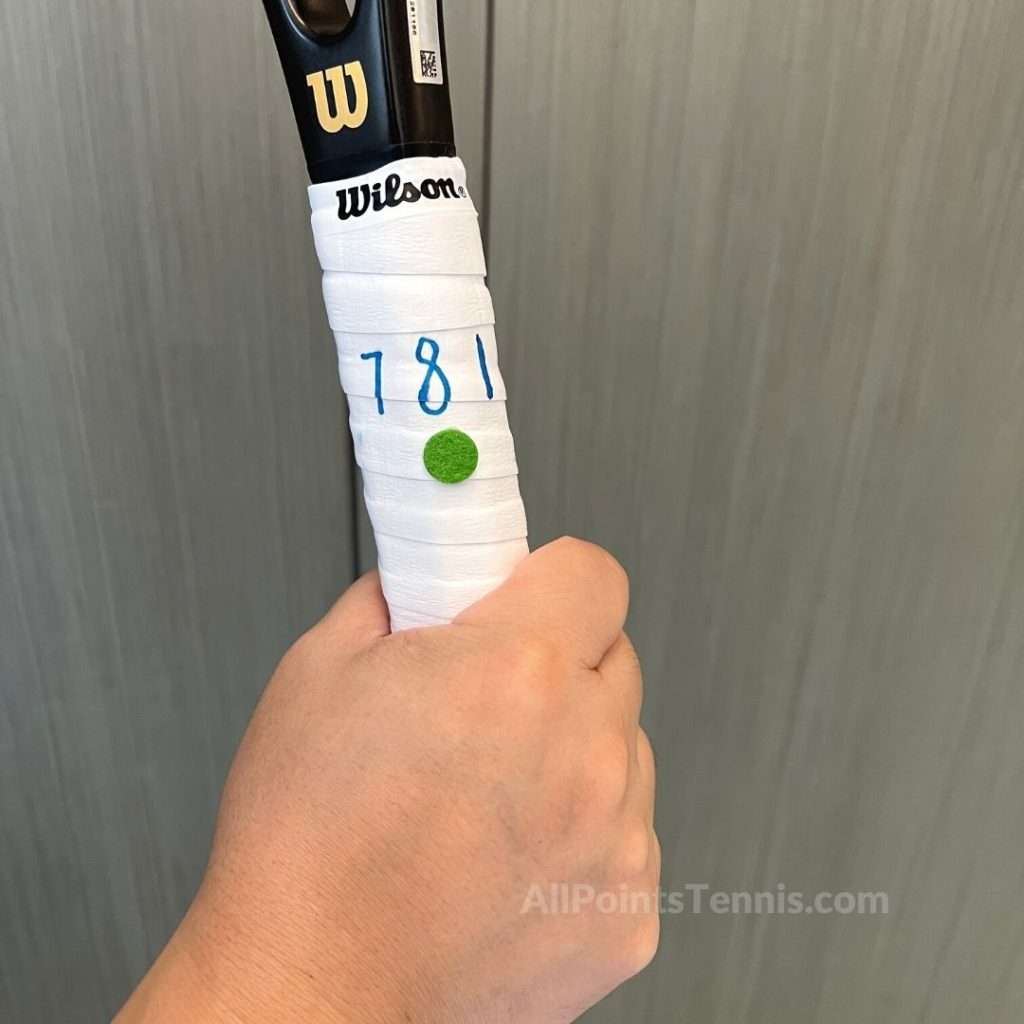
Put index finger knuckle on Bevel 8. The grip enables you to put less power but more topspin than the eastern backhand grip. It’s more difficult to master than the Eastern Backhand Grip. Beginners should avoid learning this grip, and it’s used least by Pro players.
- Position: bevel 8
- Ideal for: one-hand backhand
- Pros: more topspin than eastern Backhand, great for high balls, easy transition to semi-western forehand
- Cons: hard to hit low shots, tend to hit the ball into the net, most difficult one-hand Backhand to master
7. Two-handed Backhand
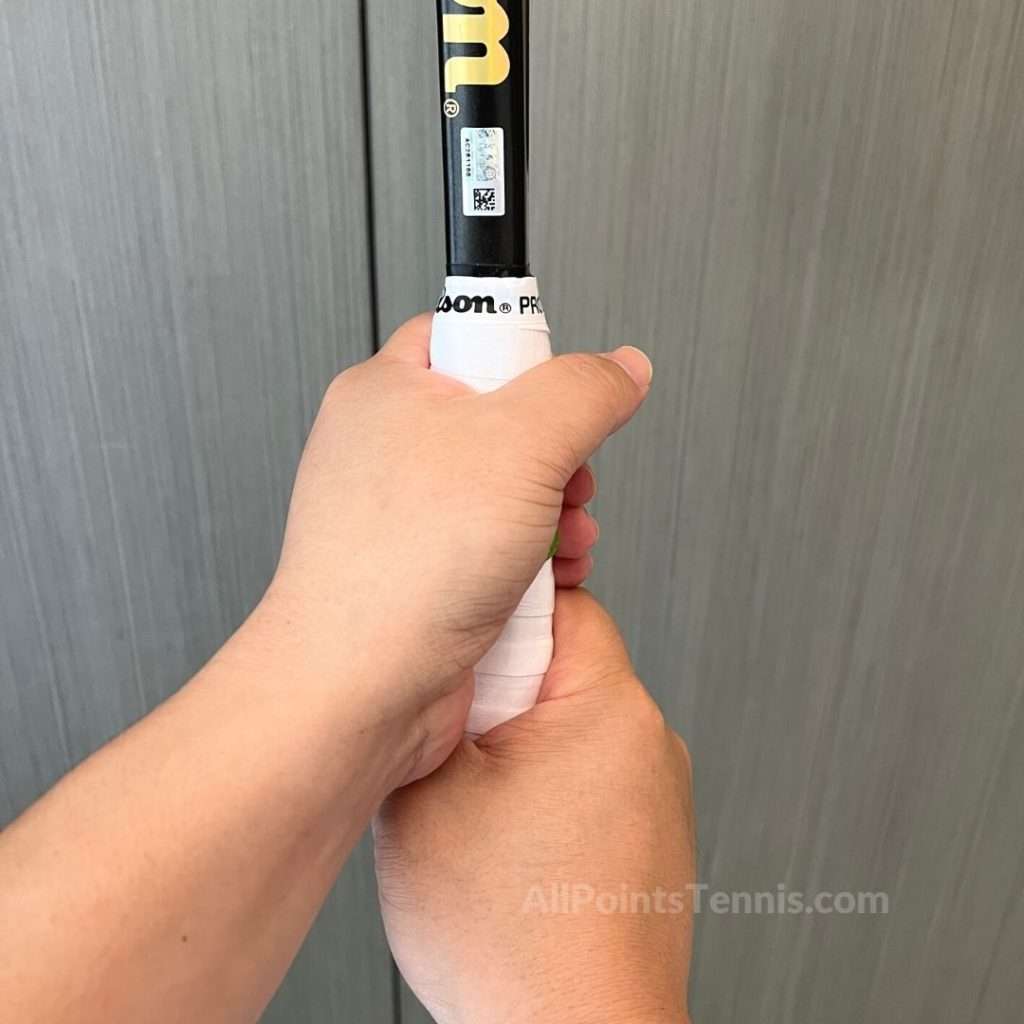
Place your dominant hand on bevel 2, non-dominate hand on bevel 6 or 7, or anywhere in the range from bevel 6 to 7. It’s the go-to Backhand to master when first learning the Backhand. It will increase control when returning serves, low shots, and balls at shoulder level. And it relies on shoulder rotation and proper swing to produce power. Pro players use two-handed backhand: Andre Agassi, Novak Djokovic, Marat Safin, and David Nalbandian
- Position: non-dominant hand on bevel 6 to 7, dominant hand on bevel 2
- Ideal: two-hand backhand
- Pros: more control, power, easiest Backhand to learn, low shorts,
- Cons: less reach, hard to hit wider shots
8. Serve
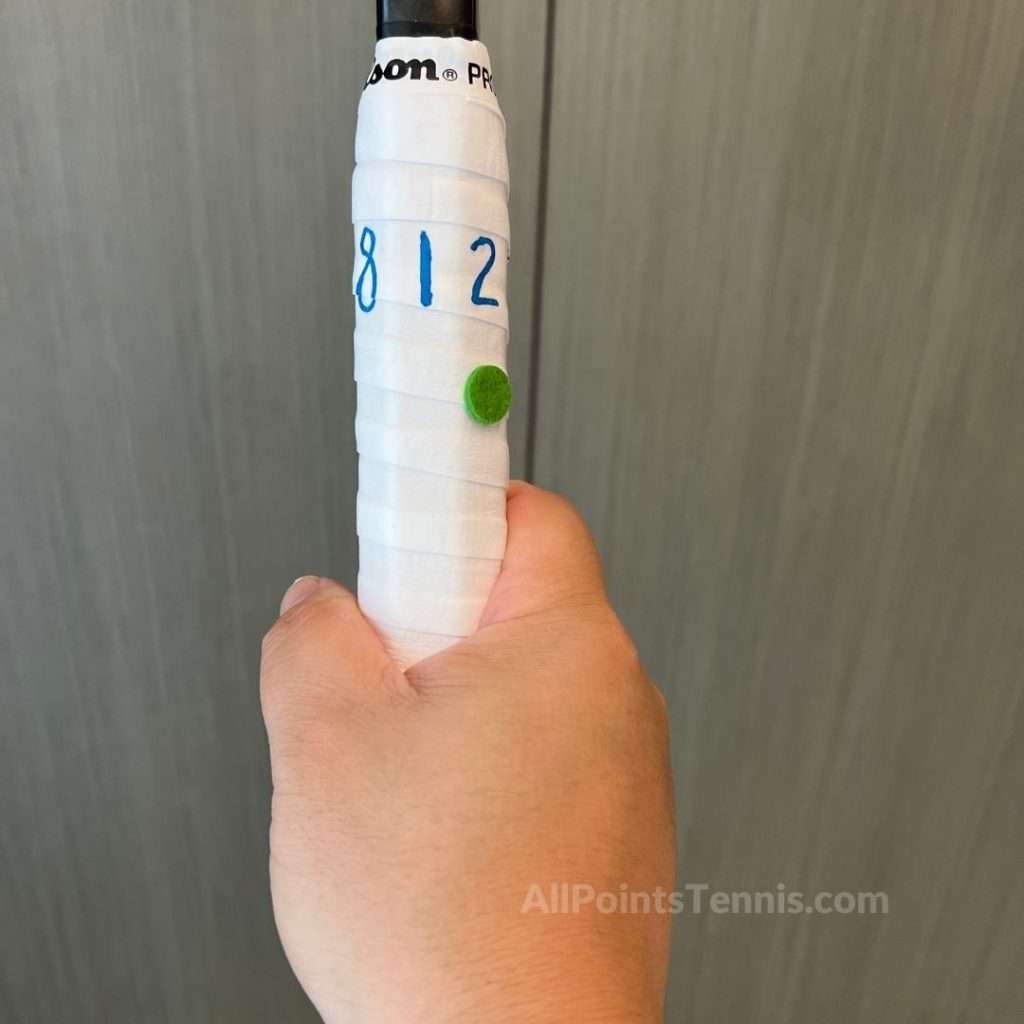
Your index finger knuckle will be on Bevel 2. Continental is the best grip for the serve, whether you want to serve the ball with a flat, slice, or kick. You need protection and stability to maximize the serve with speed and power. Recommended for all levels of players, even if you’re a beginner.
- Position: bevel 2
- Ideal for: serves, volleys, overheads,
- Pros: more power, less stress on the arm
- Cons: Hard to generate topspin, lack of consistency
9. Volley, Slice, Overhead, Dropshot
All these shots are the same family, so they will be the easiest if you hit them with a continental grip (bevel 2). It provides the most stable wrist position with the L-shape. It can not only straighten the racket face out on a high ball but also open the racket face up without putting the wrist in a weak position. It’s the go-to grip for all these strokes.
- Position: bevel 2
- Ideal: serve, volley, slice, overhead, drop shot
- Pros: versatile, stability, protection on the wrist
- Cons: a little less spin than other forehand grips
10. Which Tennis Grip Is Best for Beginner and Intermediate Players?
Tennis Forehand Grip: Start with semi-western (bevel 4); your hands will find out what works best for you later.
Tennis Backhand Grip: two-handed backhand is the go-to choice for beginners because it’s easier to learn than a one-handed backhand.
- Two-handed Backhand: non-dominant hand bevel 6 to 7, dominant hand on bevel 2
- One-hand Backhand: Eastern Backhand on bevel 1
Serves, volley, Slices, Dropshots: Continental grip (bevel 2)
11. How to Hold the Racquet Properly?
Step 1: Grip the racquet handle with the thumb and index finger; the rest of the 3 fingers are along for the ride.
Step 2: Make sure the bottom of the racket handle needs to be inside your hand.
Tips:
Your thumb and index finger will do more work than your pinkie. And rest fingers are curled against the bottom of the racquet handle edge as a stabilizer.
Don’t squeeze your racquet too tight, which will cause tendinitis, arm, hand, wrist injuries, or tennis elbow. You can feel that it’s much looser in the wrist and allows more freedom of motion.[1]
Try a fresh overgrip as a tackier grip to prevent slippage and chafing to avoid blisters. Some chafing on the inside edge of your thumb is unavoidable (I have a bit of a callus there).
12. How to Choose the Racquet Grip Size?
There are two methods to ensure you’re getting the correct grip size. One is the ruler test; the other is the finger test. Please note that these methods are for you to narrow down the options only.
Ruler Test
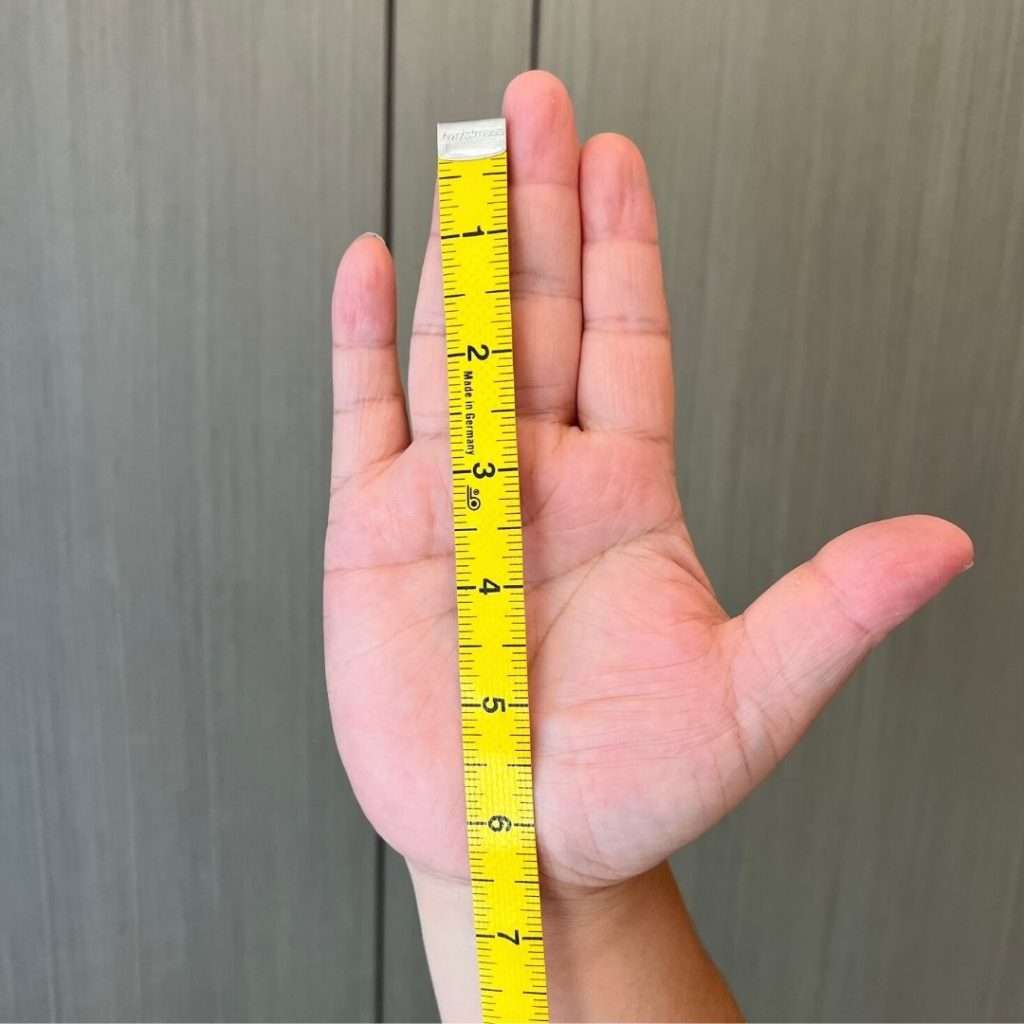
Measure your grip size by using a ruler. Measure the distance from the palm’s horizontal bottom crease to the ring finger’s tip.
Finger Test
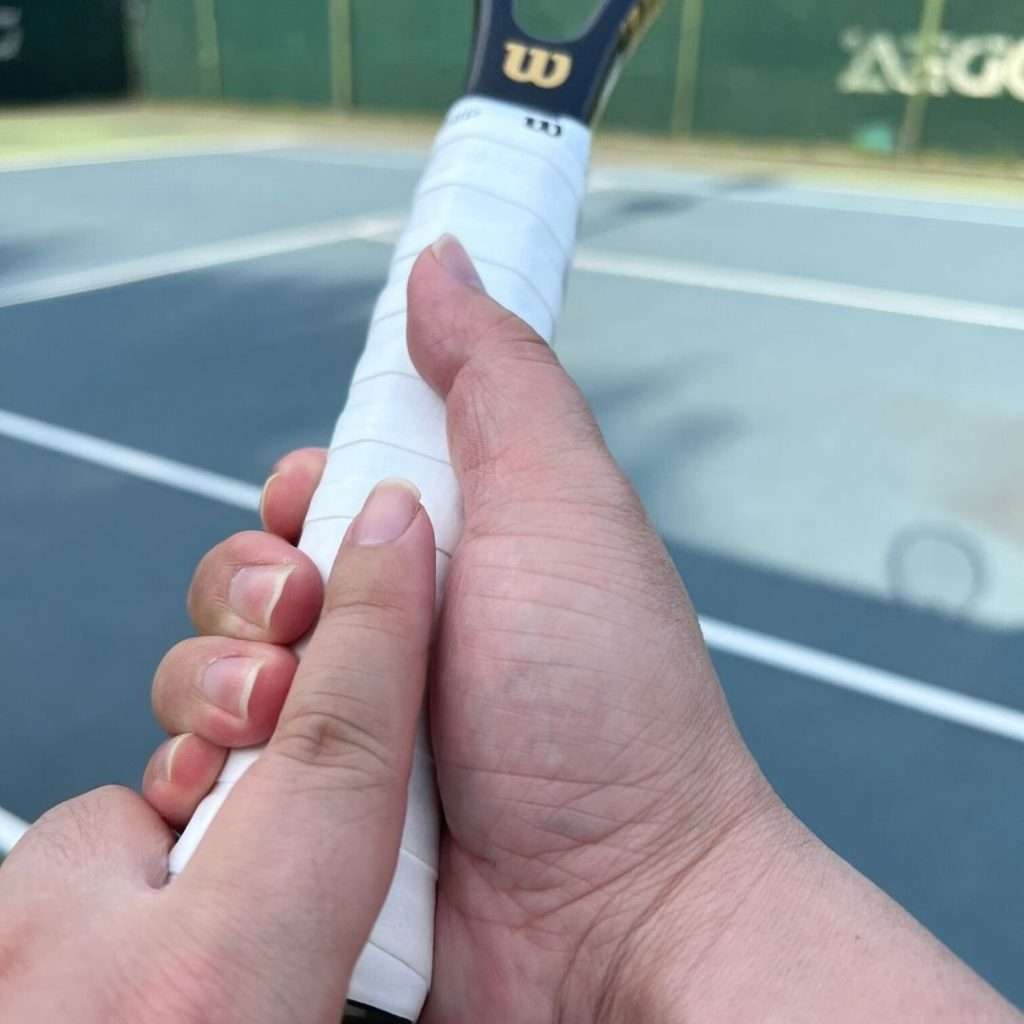
Hold the racquet with an eastern forehand (bevel 3) and fit the index finger of your non-dominate hand in the space between your fingers and palm. The grip is small if there isn’t enough room for your index finger; it’s big if there is space between your finger and palm. You want the index finger to fit with little or no room. It will give you the most comfortable and secure grip.
Racquet Grip Size Chart
| US Grip Size (inches) | Euro Grip Size |
| 4 | 0 |
| 4 1/8 | 1 |
| 4 1/4 | 2 |
| 4 3/8 | 3 |
| 4 1/2 | 4 |
| 4 5/8 | 5 |
Between two sizes? Generally, you should go for the smaller one between two sizes because you can add an overgrip to build up your handle thickness.
The Most Common Sizes
– Men: 4 3/8 (3)
– Women: 4 1/8 (1), 4 1/4 (2), 4 3/8 (3)
– Kids: 4 or less
Still unsure of your grip size? Check out our article on how to determine your Tennis Grip Size.
What’s Next?
Take some time to experiment with your forehand and backhand, and start with what feels the best for you.
I started with the eastern forehand but ended up somewhere between eastern and semi-western. Understand that your starting grip may change as you become a seasoned player.
